Connecting from Client Apps
The purpose of this document is to discuss how to connect to the Emby Server from additional devices, both within your home network and externally.
Browse this document to aquaint yourself with the types of issues that may arise and what they would impact and how to address them.
For any new connectivity issues, use the checklist below to troubleshoot : Troubleshooting Connectivity Issues Checklist.
To learn how to grant users access to your server, see Users.
In most cases you won't need to do any extra configuration to connect to your server from other devices, as Emby apps are built to automatically know how to connect to it. But on some systems or if you have more than one emby server with remote access enabled, some manual configuration may be necessary.
This document is primarily designed for troubleshooting, when the automatic features do not work and a custom configuration is needed.
In-Network Connections
Most Emby apps can automatically discover your Emby Server on your home network, so in those cases, there's nothing more you need to do. But in the event this does not work, you can still connect to your Emby Server by manually entering the server's address.
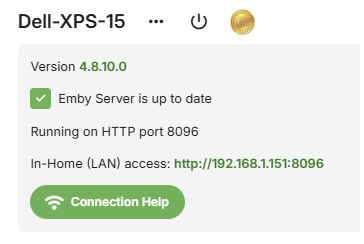
To locate your server's internal address, simply open the Emby Server Dashboard on the Emby Server machine, typically through http://localhost:8096 and clicking on the Manage Emby Server gear icon in the top right corner.
Your Emby Server's local address is then displayed in the In-Home (LAN) access field in the Dashboard view.
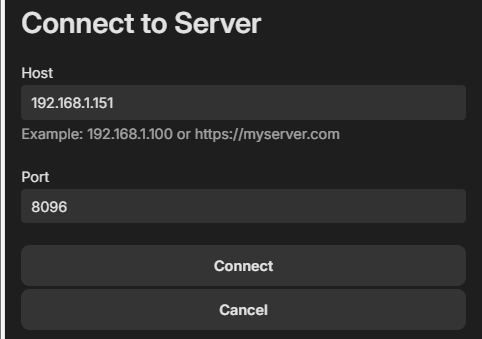
This information can then be entered into Emby apps when making a manual connection through the Add Server option:
It is recommended that the local IP Address for the Emby Server machine should be fixed. Use the router's DHCP Reservation feature to do that. Here is a general guide for doing this. https://portforward.com/dhcp-reservation/#how-to-make-a-dhcp-reservation-in-your-router
Troubleshooting Internal Connections
If the above still does not work, please ensure the machine running Emby Server is turned on, and that the Emby Server application is running. Check through Task Manager on Windows, Activity Monitor on MacOS, or ps -e command on Linux.
A useful test is to try to use a web browser on another device, such as another computer, smartphone or tablet. You'll need to ensure the other device is connected to the same WIFI network. Try opening a web browser on that device and entering the local address manually:

Windows Network Profile
If running the Emby Server on Windows, check that your network connection is set as Private and not Public. The profile may get switched to Public after re-configuration or updates. Check all the Windows network connections, Ethernet and WiFi. Example for an Ethernet connection:
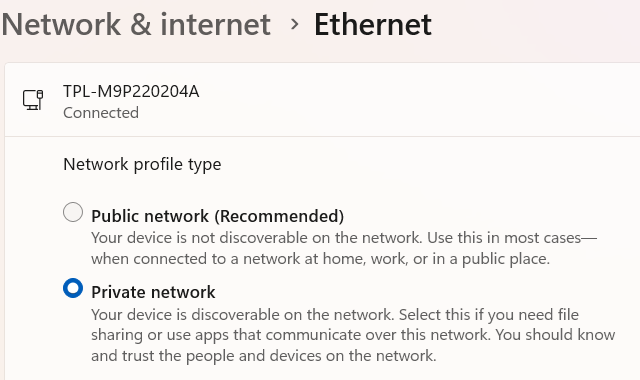
See section headed Make a network public or private in this Windows support article Essential Network Settings and Tasks in Windows.
The follows shows the differences between the two network profiles:
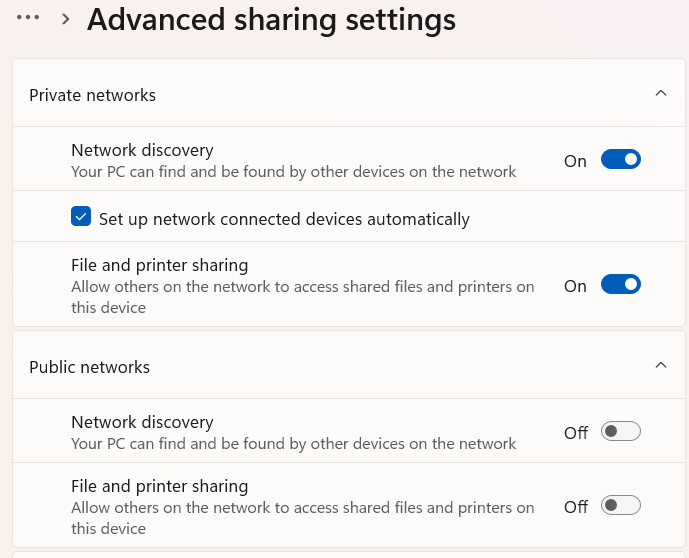
If this is set correctly as Private and you are still unable to connect to the emby server locally, then most likely the firewall on the server machine is not allowing access. Below are a list of troubleshooting steps that can be taken to resolve this.
Open TCP Ports 8096 / 8920 & UDP Port 7359 on your server's firewall
If running Windows, the built-in Windows Firewall is usually auto-configured by Emby Server. You may validate this by inspecting the Windows Firewall rules and checking to see Inbound Rules for the EmbyServer.exe for both tcp and udp and Inbound Rules for local TCP ports 8096 and 8920 and for server discovery on the local network, UDP port 7359.

The port rule names are being changed and you may see them as:

and for the program rules:

To configure the windows firewall, see How to open a port in Windows Firewall which goes through an example of how allow a specific port through the firewall. Enter port 8096 instead of the port shown in this example. If you have secure connections enabled, do the same for tcp port 8920. And add a rule for UDP port 7359 - this is used for server discovery by client apps.
Important
Please do not attempt to skip this step by disabling Windows Firewall, as this usually does more harm than good.
If you're using third party firewall software, you'll need to follow it's instructions to open the port.
Note
If you're using third party antivirus software such as Norton Internet Security, it will most likely have it's own firewall that will need to be configured.
Run an AntiVirus Scan
If you're certain you've opened the port and are still unable to connect, the next step will be to ensure the server machine is free of viruses and malware. See AntiVirus software.
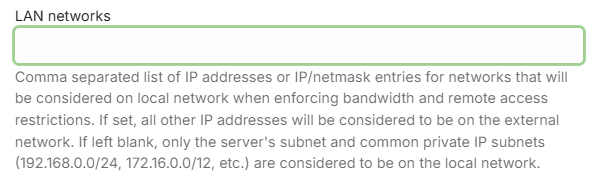
Check "LAN Networks" server Network setting
If the LAN Networks setting is filled in with a value, make sure that the local network is included. If the field is empty and you are using only one network subnet, then this is not relevant to the problem. If you have more than one local network subnets, include all the subnets in the LAN Networks field.
Router AP Isolation
If you find that wired devices can access the Emby Server but not devices on wi-fi, check the router wi-fi settings to see if "AP Isolation" is enabled. Disabling this would allow wi-fi connected devices to see other devices on the local network. This would be a valid setting to have enabled for a "Guest Network", so check first if your wi-fi is configured as a Guest Netowrk.
Use of VPN
When using a vpn on your router, the requests coming into the server from within the local network may not appear as local. You would need to add the local network subnet used by the vpn to the LAN Networks server Network setting. Ensure you also include the local network subnet that the server is connected to as well.
As an example, if your local network is on subnet 192.168.1.xxx and the vpn is using subnet 10.253.0.xx, then you would enter: 10.253.0.0/24,192.168.1.0/24 in the LAN Networks server Network settings covering IP address ranges 10.253.0.1 to 10.253.0.255 and 192.168.1.1 to 192.168.1.255. See LAN Networks.
CORS Mixed Content Block
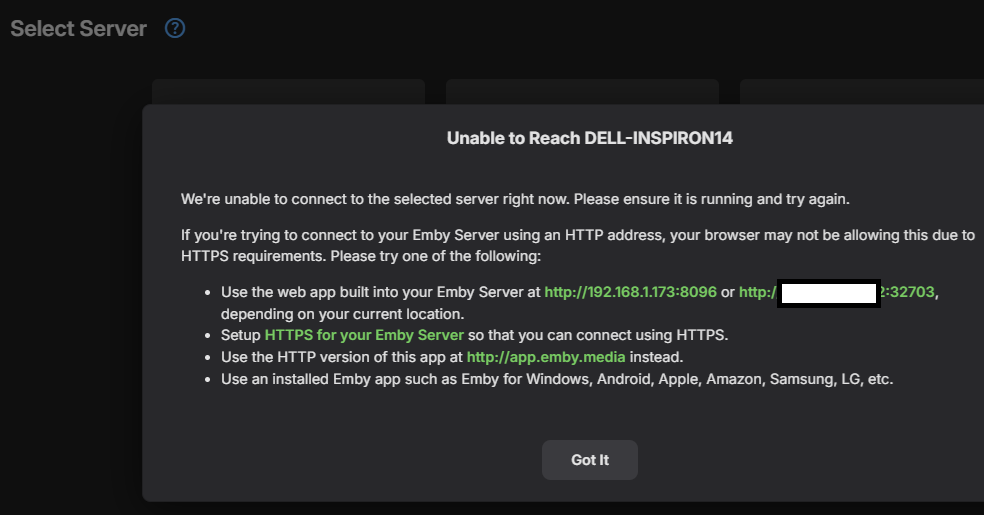
When using the hosted Emby Web app at app.emby.media, access to the Emby Server may be blocked when https secure connections is not enabled on the server and the access in the internet browser is through https://app.emby.media. It gets blocked by the browsers because mixed mode of https and http is not permitted. Entering the http url in the browser http://app.emby.media would get round this problem.
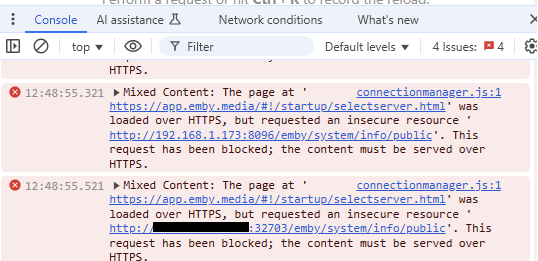
You can establish if this is due to the CORS mixed mode error, by opening the browser Dev Console (through the F12 key) and checking the console for errors. You would see an error like this
External Connections
Emby Server also allows you to connect when away from home. We call these external connections because they're out of our home network. Before we begin, we'll assume everything covered above in the In-Network Connections section is functioning correctly with your Emby Server, and that you're able to connect using other devices in your home network. If not, then you'll want to go over that section first.
Turn on Remote Access
The first step is to ensure remote access is enabled. You do this from the Server's Network menu by enabling "Allow remote connections to this Emby Server".

Note
Once you have remote access working, if you wish to allow users to connect remotely, you will need to also enable the option for the user accounts - see Users.
On the same page down below this section, you will see this option:

If you have a router that supports UPnP and have this turned on, you can enable the "Enable automatic port mapping" feature. If you do not see this option, please install the Port Mapper Plugin from the plugin catalog.
Note
Most routers have the UPnP option turned off by default.
If you turn on automatic port mapping in Emby Server (option shown above) and enable UPnP on your router, you likely are done and Emby will work remotely!
Note
If you just enabled UPnP on your router, please restart the Emby Server.
Automatic Port Mapping
When "Enable automatic port mapping" is enabled, Emby Server will initiate a port mapping request to the router for the http port, and if secure connections are enabled, to also do it for the https public port, to forward to the local ports. Automatic port mapping requires uPnP to be enabled in the router, as mentioned earlier.
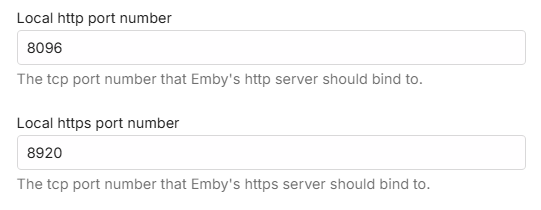
The public ports are by default set to:
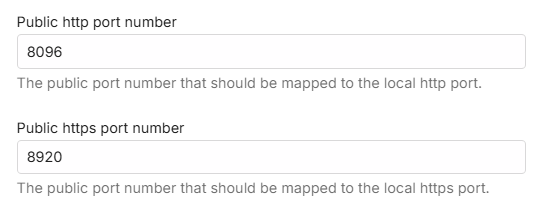
You may wish to change the public port numbers for added security.
The following shows the local ports for the server. It is recommended that these local port numbers are left as per the default:
There are tools available to show you what ports are mapped in the router through uPnP. These are useful, because not all routers give details of what dynamic port mapping through uPnP is active. One such tool is uPnp Wizard.
If automatic port mapping does not work, you should disable the setting and switch to setting up port forwarding manually on the router.
Note
If you have more than one router, you will need to do the port mapping manually. See the next section.
Setup Port Forwarding
If you're unable to connect after testing the above settings with automatic port mapping, then you may need to setup port forwarding manually in your router to allow external connectivity to your Emby Server.
To do this, turn off the "Enable automatic port forwarding" option just set and open the web interface for your router. If using the default public port numbers, you will need to setup a port forward rule for TCP Port 8096 on your router to port 8096 on the Emby Server machine. Do the same for port 8920 as well (if using SSL/secure connections). If you have chosen different public port numbers, then it would be these that need to be specified in the port forward rules.
It is important that the local IP Address for the Emby Server machine does not change. Use the router's DHCP Reservation feature to do that. A good general guide can be found here.
The process of doing a port forward will be slightly different for each router model.
Here are good step by step general guides on how to do this:
https://portforward.com/dhcp-reservation/#how-to-make-a-dhcp-reservation-in-your-router
This Youtube video also explains Port Forwarding pretty well:
If you want to use different public port numbers, enter the required public ports in the server Network Settings fields.
Here is an example router setup showing 2 tcp ports forwarded - using the default public port numbers:
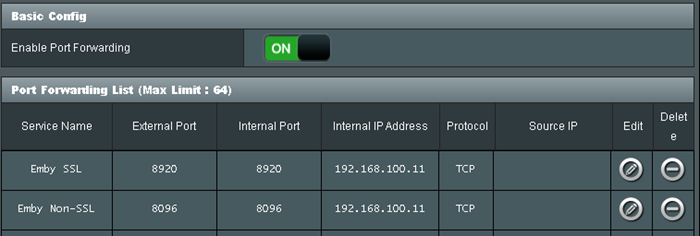
You will find different names for the ports on different routers when setting up the rules. e.g. The public ports may show on the router as WAN Port, or Public Port, or External Port. The local ports may show as LAN Port, or Local Port, or Internal Port or Private Port.
Note that the Source IP / Remote IP should always be blank in a port forward rule.
The server IP Address, to which the port forwards are routed to, may show on the router port forward setup page as host computer, Local IP Address, or Internal IP Address, or Private IP Address.
Multiple Emby Servers on the network
If you have more than one emby server on the local network, then you will need to make sure they use different public port numbers as they would be routing through the same public IP address.
The default public / WAN ports are as follows:
Set a different http and https port (where applicable) for each of the servers. If your first server used 8096 and 8920, then you only need to change the public ports for the other server(s) to use different port numbers.
Multiple Routers / Mesh Network Added
If you have more than one router, eg an ISP provided router and also your own router, or you've added a Mesh Network, then that could lead to a Double NAT which would give rise to failure to reach the server externally.
To establish if you have a Double NAT and what steps you need to take to get round the issue, see Multiple Routers Double NAT below. Basically you will have two ways to choose from, either by making sure there is only one operating as a router or to manually setting up port forwards to cascade all the way through.
Locate Your External Address & Public Port
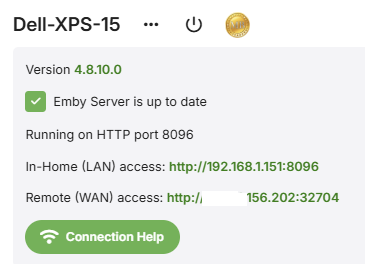
You will need to find out what your external IP address is, when troubleshooting remote connectivity issues or to add a manual connection to the server from a remote emby client. When remote connections are enabled, your external address is displayed on the front page of the server dashboard, labeled as Remote (WAN) access. The public port is also shown. This is the address you should use when away from home together with the public port number.
Verify Your External IP Address
Open a browser and visit canyouseeme.org.
The IP you see listed here must match what Emby shows on the dashboard. If it doesn't, remote access will not work and likely your ISP is using cgNAT or you are using a VPN.
If the IP address matches, then you can proceed to test the connection through the public port. If your external IP addresses changes frequently, consider using a DDNS setup (Dynamic DNS).
Verify Public IP and Port
Again, you can use canyouseeme.org in a browser and enter each of the public ports that have been configured.
You can also test your external address and public port by opening a web browser while away from home, or inside your home using a smart phone or tablet with the wifi connection turned off.
Important
Testing your external address inside your home might not work, and this is OK. Some internet routers disable loopback capabilities (going out and coming back in), therefore you might not be able to test this from inside your home network. It's important that you test away from home, or with your smart phone's or tablet's wifi connection turned off.
If these succeed, your Emby Server should be working remotely and can proceed with connecting from Emby apps. But, if you find that even with this being successful, a device is still failing to connect remotely, check that you have allowed remote connections for the user account that is making the attempt. Refer to Users Settings and check that in the user settings, "Allow remote connections to this Emby Server" is ticked for that user account.
If you continue to fail to connect remotely, you should re-check the setup mentioned above and you will need to do some further troubleshooting. See below for a checklist of the troubleshooting areas. Please visit our forums for assistance, if you continue to have an issue with this.
Troubleshooting External Connections
VPN
If you have a VPN running on the host computer, TURN THIS OFF as that may interfere with your Emby Server routing.
Anti-Malware and Firewalls
If this is not the case, try temporarily disabling (turn off) any local malware & firewall software running on the same host, to see if they may be blocking Emby. If this was the cause, then you will need to look into the Firewall / Security software to configure it so that the Emby Server application is allowed to accept external connections into the local http and https tcp port for the server
Local IP Address change
If you are using a manual port forward setup and the local IP Address changes, then the existing port forwards will no longer route to the server. Look into fixing the local IP Address using static IP address or preferably a DHCP Reservation in the router, or both. Make sure any port forwards are updated to the new local IP address.
See https://portforward.com/dhcp-reservation/#how-to-make-a-dhcp-reservation-in-your-router
cgNAT Double NAT
You could also be having a Double NAT setup through your ISP giving you a cgNAT (carrier grade Network Address Translation) public IP address.
To check if you have been given a cgNAT public IP Address, see if it is within this IP range
100.64.0.0 - 100.127.255.255
If it is the case, you would need to ask your ISP to give you a static public IP address outside this range. ISPs normally have a monthly fee for this.
External Public IP Address change
If your external WAN/Public IP address changes, you may find that emby clients fail to connect to the server, especially if the server connection details were added manually on the client app Add Server screen. In such case, you will need to delete the server details on the client - on the Select Server screen and add it again with the new connection details.
You can mitigate the impact of changes to the external IP address by exploring the use of a DDNS (Dynamic DNS service) configuration. Alternatively you can request a static Public IP Address from your ISP. There would normally be a charge for that. You can also look into using Emby Connect to link the local emby user account to your Emby Connect email address and use Emby Connect login within the app to connect to the server. See section on Emby Connect below.
Multiple Routers Double NAT
If you have 2 routers, eg an ISP provided router and your own router, there will be Double NAT and port forwarding will not work. Similarly, if you have added a Mesh Network then there could be a Double NAT.
A Double NAT can be confirmed by checking the Public IP address displayed by https://whatismyipaddress.com/ or https://canyouseeme.org and comparing it to the WAN IP address displayed within the router/mesh network control device settings, the one that the emby server machine is connected to. If the addresses do not match, then most likely you have a Double NAT.
Note
A cgNAT public IP address may also show up as Double NAT. To establish if it is due to cgNAT, see cgNAT Double NAT above.
If there is a Double NAT due to having multiple devices operating as network routers, you will need to make sure only one is acting as a router or a more complex option, to cascade the port forward all the way through to the Emby Server, going through both.
If you have added a Mesh Network, you can set the device to operate as an Access Point and not a router. This would then leave your existing router to have the port forward.
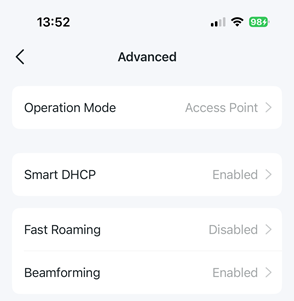
The following is an example for a TP-Link Deco M9 Plus Mesh Network. The Deco mobile app has in Advanced Settings an option for changing the operation mode.
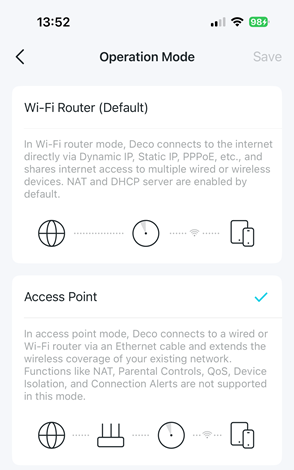
and in the following, you can see it is set to operate in a passive mode as an Access Point.
In the case of an ISP Modem/Router and also having your own router, the best option here is to see if the ISP provided device can be set to operate in Modem / Bridge only mode and that would leave your router to manage the port forwarding and local network. You may need to contact your ISP if the modem/router settings are locked down.
For this, you can also operate with the ISP Modem/Router acting as a router and your own router switched to be in Access Point mode.
For both cases mentioned above, you can keep them operating as routers but you would then need to have a complex port forward setup where the port forward on the first router (ISP router) is manually setup and cascaded through to the second router/mesh network device and that would have the port forward to the Emby Server. In the example below reference to second router also means the Mesh Network main controlling unit.
In this example, if your server public http port is 32700
- Have the local IP address of the 2nd router as a DHCP reservation in the first router - so it remains fixed. You would need to find the Mac Hardware address of the WAN Port of the 2nd router and use that to specify a DHCP reservation for it in the first router
- On the first router, setup a tcp port forward for http port 32700 to forward to port 32700 to the local IP address of the second router.
- On the second router, setup DHCP reservation for the Emby Server local IP address
- On the second router, setup port forward for the http public tcp port 32700 to forward to port 8096 to the local IP address of the emby server machine.
- If you have also enabled https and for example you have public port 32800 for that, then you would need to repeat the steps above to forward 32800 from first router to the second router and then forward 32800 to the emby server local IP Address to tcp port 8920.
Multiple Servers - Public Port clash
If you have more than one system running emby server on the local network and remote connections enabled, then with the default settings there would be a public port clash and the remote connections would be attempting to go to the first system that was configured. In such cases, you will need to change the public ports and ensure that each emby server has a different public port.
ISP Blocking
You may also be blocked by your ISP. Open command prompt session and do a trace route to 8.8.8.8.
On windows it would be: tracert 8.8.8.8
Ignore the first line which will be your own router. What you want to see is if any of the next 3 or 4 lines start with 10., 192. or 172. If the first octet number is a 172 we need to check the second octet number to see if it's between 16 to 31 (172.16.xx.xx to 172.31.xx.xx). If any of these returned lines matches this you are likely being blocked by your ISP.
Emby Connect
Regardless of the method used for port forwarding, whether it is automatic using uPnP or a manual configuration of the router, we suggest trying out the Emby Connect feature as it takes the guesswork out of external connectivity. The Emby apps would find the route to the server using Emby Connect. See Emby Connect.
Troubleshooting Connectivity Issues Checklist
Use this checklist to help with finding out the cause of any new connectivity issues.
1. Local IP Address
Check if the Local IP Address for the Emby Server changed. When this happens, any port forward in the router for external remote access would still be for the old IP Address. Client Apps may also be attempting to use the IP address already known to them from previous connections.
You should use static IP address and/or DHCP Reservation for the device/computer running Emby Server. See section about that above in In Network Connections.
If the IP Address has changed, any port forward in the router needs to be corrected - but only look into that after ensuring the IP Address will no longer change with use of static IP Address and/or DHCP Reservation.
For manually created port forward, you will need to login to the router and correct the destination IP address for the port forward. See Setup Port Forwarding above.
For automatically created port forward with uPnP and the emby server setting: Enable automatic port mapping, you will need to shutdown Emby Server, then reboot the router to clear the existing cached uPnP port forward and then launch Emby Server.
If you are using Emby Connect, you may need to unlink and re-link the user account to the Emby Connect e-mail address to refresh the Emby Connect data.
Exit Emby Apps and relaunch them.
2. Windows Network Profile
If running on Microsoft Windows, check if the Network Profile got switched from Private to Public. This has been seen to arise after some system updates. See section Windows Network Profile above.
3. Public IP Address
Check if the public IP Address for your network got changed. This does happen sometimes on router reboots or periodically by the ISP and would arise more frequently when the ISP provides you with a cgNAT IP Address. This would affect external remote access. Emby client apps may still be attempting to use the old Public IP Address known to them.
If this happens regularly, look into using a domain name and DDNS service to periodically refresh the IP address. See section External Public IP Address change above. If you have a cgNAT IP address, you should be able to request a static public IP address from your ISP for a small fee. See section cgNAT Double NAT above.
You can test out access to the server with the new public ip address by adding the server manually on the Select Server screen and giving the public IP address and public port. Note that access through the public IP address may be blocked by routers if you try to test it out locally. Best to do this test externally and could be done on a mobile device connected through cellular connection and not wifi.
If you are using Emby Connect, you may need to unlink and re-link the user account to the Emby Connect e-mail address to refresh the Emby Connect data.
4. Router Settings
Sometimes router settings get lost and any existing port forwards may disappear. This has been seen to happen after some remote ISP updates to routers overnight. If you had any manual port forwards, and they no longer show, you will need to reinstate them. See Setup Port Forwarding above.
The next checklist is to help with issues arising after a change.
1. vpn added
See section Use of vpn above.
2. Switched ISP provider
You may find that after switching ISP, you are now given a cgNAT IP address or that your public IP Address is now changing more frequently than before. See sections cgNAT and External Public IP Address change above.
3. Added a modem/router or mesh network
This may give rise to a double NAT setup. See Multiple Routers Double NAT and Multiple Routers / Mesh Network Added sections above.
4. Added another Emby Server
You may have added or launched another emby server and this new server is resulting in a port number clash. See Multiple Servers Public Port Clash
5. Restored server from backup
If you have restored a server and restored the server id as well and not shutdown the old server, you will have two servers with the same ID. Make sure the old server is no longer running and would not auto launch.
Finally, please do browse this whole document for additional information.